

Dirt has been used in construction for millennia, and there are some very tall dirt buildings that remain in tact. It is usually a cheap or free material, but can often be more labor intensive than other mediums.
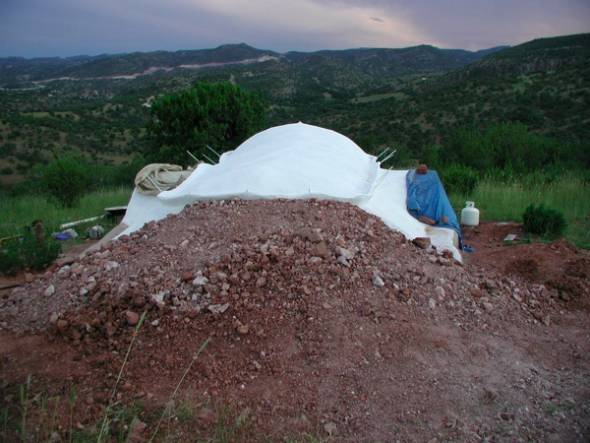
Burying your home into the ground is a great way to save on energy needed to heat or cool the space. Earth has a constant temperature beneath its surface and adds incredible thermal mass to your walls.
Wherever possible, we try and bury our buildings, at least partially. The difference that this makes to the internal temperature of the room is significant. In summer, it remains cooler, while in winter it stays warmer. Much like a cave will maintain an almost constant temperature throughout the year, irrelevant of the extremes outside. The reason for this is that the earth has an immense thermal mass, and so is not as easily affected by the temperatures on the surface.
Burying your house also offers a form for much of the walls. Those walls will have to be strong to withstand the weight of the earth, so curved is better if you can incorporate that into your design.
Building the roof will be easier too, as you can work from almost ground level, instead of having to do everything from a scaffolding.
The main drawback to an underground home is the possibility of water seepage. Wet earth becomes even heavier. You will need to put much of your effort into making the house waterproof. Using tarps to line the earthen walls, making trenches on the outside to divert water flow from heavy storms. Slope any dirt piled against the house, so that rain will flow away from it.
Putting drainage pipes in the ground also helps, so that if water does seep against your walls, there is a way for it to flow out and away. The best way to do this is provide a loose gravel backfill against your wall, with a waterproof liner protecting the wall. At the bottom of the loose gravel, place a drainage pipe that drains out away from the structure. Water will enter the gravel, drain to the bottom, and exit via your pipe.
If you can bury the north side of the house and leave the south with windows, you will be able to take advantage of the sun’s rays to heat the house in winter. With an adequate southern eave, no sun will enter in summer, when the sun is at its highest. But in winter, when the sun is lower in the sky, it can enter the house, with its warmth and light. This works well on southern slopes.
For building a underground home on flat land, sink the home into the ground a few feet, and use this excavated soil to create a berm around the outside of the home. Make sure this berm is planted with perennial plants and slopes away from the structure, preferably with a vapor barrier under it.
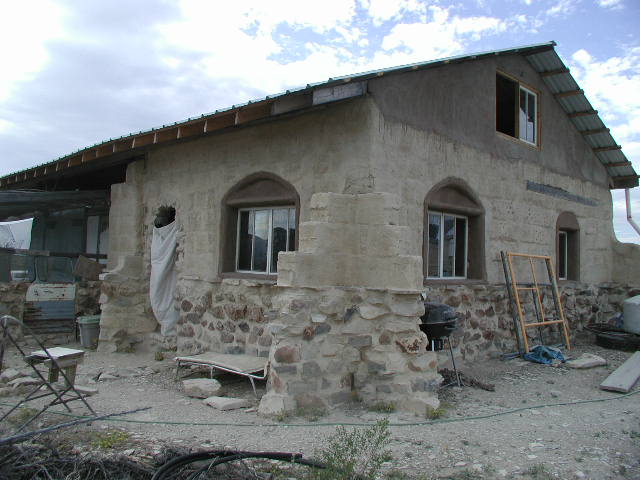
Adobe, or cob when it is applied without forms, is basically a sun-dried mud. It has been used throughout the world, in many different time periods. Several buildings, hundreds of years old, still stand.
For the DIY builder, adobe has a lot going for it:
You can use adobe for almost every part of your house – walls, floors, even roof when using bricks. For more information about the specifics of using adobe, see our how-to.
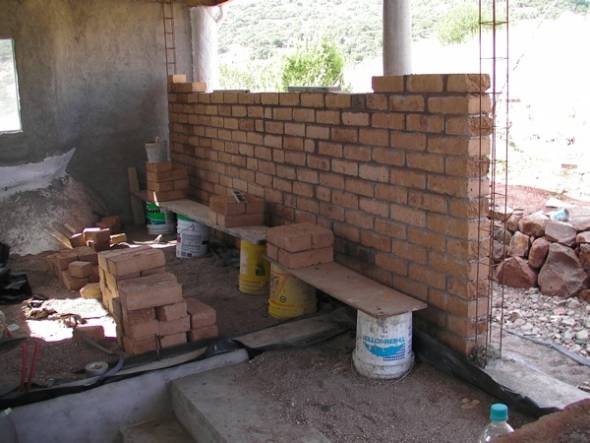
Compressed Earth Blocks, or CEB, is a cheap, strong and beautiful use of dirt in your building, whether for walls, floor, or complete arched houses.
Compressed Earth is similar to adobe in its composition, but it is made by compressing moist, but not wet, earth into a stable form. The resulting brick is several times as strong as adobe and the consistency of the blocks can be very precise. Blocks are made with a press, and all sorts of configurations are available depending on the type of block desired.
The starting point with Compressed Earth Blocks, or CEBs is the soil. CEBs require a proper mixture of a binder and aggregate for strength, similar to concrete. The binder in this case is usually clay, the aggregate sand, and some sort of stabilizer, like lime or Portland cement is used to give the bricks added durability. A simple soil composition test can be done with a clear jar and some water. Fill the jar half way with soil, then add water to the top. Add a few spoon fulls of salt to help with the separation. Shake the jar vigorously, and then set it down and allow the contents to settle for an hour or two. Once the contents have settled, you will see specific layers form. The bottom layer will be your aggregate, then your clay/silt layer, and finally the organic material will be on top. You want about 15-40% clay/silt to 60-85% sand. Little to no organic matter is best.
Once you have chosen your soil, you will need a press. You can either make a hand-operated press that can output 1-3 bricks a minute with three people, or you can make a fancy hydraulic version that can output 6-10 bricks a minute and can be mostly automatic in its operation. Cost will be a big issue, especially if you are just building one house or a room. Plans are available online, and you can even purchase pre-made presses.
Forms are needed to determine the dimensions of your bricks. Make your form an even division of the dimensions of your room. Or, make your room an even multiplication of your brick. The nicest size is 6 inches wide, 12 inches long and 4 to 6 inches thick. You will want a form for half and ¾ bricks as well, so you can avoid having to cut bricks. Bricks can also be made for your foundation, lintel, and bond beam, to be filled with reinforced concrete. This is a great method to totally build a building with a simple press and a handful of forms.
Design your form so that you can include a “key” or interlocking feature to the bricks. This will reduce the need for mortar, and can greatly increase the speed of construction.
Once made, the bricks can be either laid in mortar or dry-stacked and surface bonded, depending on the design of the structure. Dry stacking is quick, and if you designed your forms to be an even division of the wall, the walls of the house can go up in a few days, or even a few hours with a decent crew. Interlocking is a must for surface bonded walls.
CEBs are one of the cheapest, simplest building methods available. They are an advancement on adobe blocks and are far more versatile, durable and strong. See our guides about laying a CEB floor or wall.

Rammed Earth, whether in earth bags or rapidobe, is a fast and cheap way to build, irrelevant of what kind of dirt you have access to.
Earthbags or rapidobe are one of the best uses of dirt in construction. Both are fast, cheap, and require little in the way of tools. Furthermore, the composition of your soil is not as important as with adobe or CEBs.
Neither requires a traditional concrete foundation, which will save you considerable money. The water requirement is greatly reduced, saving time and energy.
This is the perfect method for someone starting from scratch with little tools or money, as you can go to a site with no amenities and start work, using only materials you find there and a few items that will fit in a car or truck.
Earthbag is a method of building that is gaining considerable popularity throughout the world, especially in areas that are poor or have suffered a natural disaster. The main reason for this is that few skills, tools or materials are required to build a strong home quickly. You are also not locked in to particular shapes or dimensions, so your design can be unique.
In a nutshell, you fill bags with dirt, tamp them well and use them as your building block. You can place barbed wire in between each layer, so that they do not slip. You then cover it all with a stucco.
The need for foundations and bond beams are reduced, and you can use simple, low cost methods for these components.
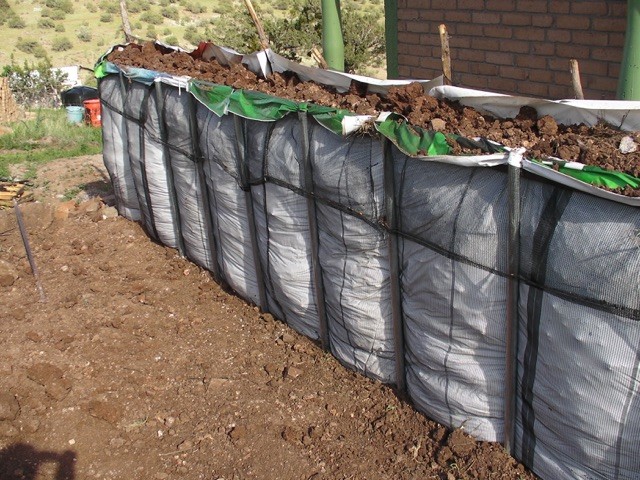
Rapidobe is a variation on earthbags of our own design. We really like the idea of earthbags, but thought, why not just make one big bag instead of laying several.
So, when we decided to add a storage room to the north side of our house, for added thermal mass as well as space, we figured we’d try it out. It surpassed all our expectations.
We made a gravel foundation, then put posts on either side of it, every couple of feet. We then strung hail screen (which we later stuccoed) and a vinyl tarp in a U-shape between the two lines of posts. We added dirt (without screening it in any way) into the big bag, tamping it as we went. We attached a metal bond beam to the posts, tied up the bag and stuccoed it.
It was super fast, very cheap and has an excellent thermal quality (as we made it more than a foot thick). 3 people were able to build a 30 feet wall in 2 days.
We have more detailed instructions in this how-to.


